How to use 16×2 Character LCD + 6-buttons Keypad Shield ?
The LCD-Keypad Shield attaches to your Arduino board to provide a 16-character by 2-line display, white character, blue back light LCD with a keypad consisting of 5 keys > “select”, “up”, “right”, “down” and “left”. With this shield you will be able to move through menus and make selections straight from one board attached to your Arduino without requiring a massive tower of shields or wiring tangling around.
The LCD-Keypad Shield works perfectly in 4-bit mode with the “LiquidCrystal” library found in the Arduino IDE, using this library will allow you to control the LCD with only 6 digital I/O lines. This shield provides you with the capability of pushing multiple buttons at once and combining the results. No longer will you be restrained to only 5 inputs, now you have the ability to make use of 32 different button combinations!
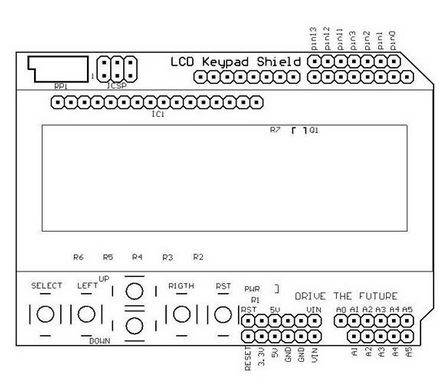
This LCD Keypad Shield use total of 6-pins to control the LCD display which is pin-4, 5, 6, 7, 8, 9. For LCD Data, it use pin-4, 5, 6, 7, while for the RS and Enable pin, it use pin-8 and 9. The Arduino-LCD Keypad Shield are only required to plug into the Arduino main board and there was no soldering are required such as shown in figure below.
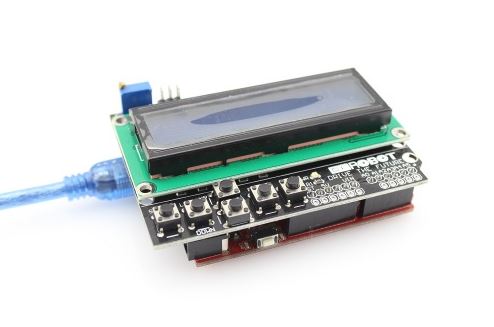 Fig-1: Plug the LCD+Keypad Shield directly onto Arduino Board.
Pins Assignment
| Arduino Pin | Function |
| A0 | Buttons ( Select, Up, Down, Left, Right) |
| 4 | LCD DB4 |
| 5 | LCD DB5 |
| 6 | LCD DB6 |
| 7 | LCD DB7 |
| 8 | LCD Register Select, RS |
| 9 | LCD Enable, En |
| 10 | PWM control for Backlight brightness |
Application Ideas
The below code listing demonstrate the use of this LCD+Keypad shield.
//==========================================================================
//  Author      : Handson Technology
//  Project     : Arduino Uno
//  Description : Display "Hello World" and 6-keys press
//==========================================================================

//Include the LiquidCrystal header file which is inside the Arduino IDE
#include <LiquidCrystal.h>

/* ==== PINS ASSIGNMNET ==========
 * LCD RS pin to digital pin 8
 * LCD EN pin to digital pin 9
 * LCD D4 pin to digital pin 4
 * LCD D5 pin to digital pin 5
 * LCD D6 pin to digital pin 6
 * LCD D7 pin to digital pin 7
 * Backlight PWM control to Pin 10
 * LCD R/W pin to ground
*/

// Set the I/O pin for LCD 4-bit mode following the library assignment:
//  LiquidCrystal(rs, en, d4, d5, d6, d7).
LiquidCrystal lcd(8, 9, 4, 5, 6, 7);

int analogPin = A0;  //Define the A0 as analogPin as integer type.
int adc_key_old;
int adc_key_in;
int NUM_KEYS = 5;
int key=-1;
int adc_key_val[5] ={30, 150, 360, 535, 760 }; //Define the value at A0 pin
                                               // when a key is pressed.

// Define each key as character string type for keypress display.
char msgs[5][15] = {"Right Key OK ",
                    "Up Key OK    ",
                    "Down Key OK  ",
                    "Left Key OK  ",
                    "Select Key OK"};


/*******************************************************************************
* PRIVATE FUNCTION: setup()
* PARAMETERS:void
* RETURN:void
* DESCRIPTIONS:
* Define of I/O pin as Input or Output
*
*******************************************************************************/
// The setup() method runs once, when the sketch starts
void setup ()
{
  lcd.begin(16, 2);            // set the lcd type: 16-character by 2-lines
  lcd.clear();                        // LCD screen clear
  lcd.print("  HandsOn Tech  ");      // Send the ASCII code to the LCD for
                                      // displaying the message

  pinMode(10, OUTPUT);                // sets backlight pin-10 as PWM output
  analogWrite(10, 125);               // Set backlight to 50% brightness

  lcd.setCursor(0,1);           // set the position of next message string:
                                // 1st position at 2nd line
  lcd.print("LCD-Keypad Sh");
  delay(5000);                        // delay for 3000ms
  lcd.clear();
  lcd.setCursor(0,0);
  lcd.print("  HandsOn Tech  ");
  lcd.setCursor(0,1);
  lcd.print("Pls press any");
  adc_key_old = analogRead(analogPin);// store the unpress key value
}


/*******************************************************************************
* PRIVATE FUNCTION: loop()
* PARAMETERS: void
* RETURN: void
* DESCRIPTIONS:
* Non-Stop looping
*******************************************************************************/
void loop()
{
  adc_key_in = analogRead(analogPin);  // Read the value at analogPin A0 and store
                                       // the value in the adc_key_in register
  adc_key_in = get_key(adc_key_in);    // Send the adc_key_in value to
                                       // get_key() subroutine.
  lcd.setCursor(0, 1);
  lcd.print(msgs[adc_key_in]);         // Display message with msgs[]
                                       // according to adc_key_in value
}


/*******************************************************************************
* PRIVATE FUNCTION: get_key
* PARAMETERS: integer
* RETURN:unsigned int input
* DESCRIPTIONS:
* convert the ADC value to number between 0 to 4
*******************************************************************************/
int get_key(unsigned int input)
{
  int k;

  for (k = 0; k < NUM_KEYS; k++)
  {
    if (input < adc_key_val[k])
    {

    return k;
        }
  }

    if (k >= NUM_KEYS)
        k = -1;     // No valid key pressed

    return k;
}
The code is self explanatory with the detail comments. Compile and upload the code into Arduino board and watch the result.
 Once the code is successfully compiled and upload into Arduino board, you should see the display as above shown.
Parts Used in this Tutorial
Documents